Quick Links
“Canvas the Castle” is one of severalOblivion Remasteredside-quests you will encounter in the town of Chorrol. Here, you’ll be tasked with helpingCountess Valgainvestigate the theft of a precious heirloom. With several possible suspects and a series of well-conceived clues, this quest is one of many that serve as a perfect reminder of whyOblivionis held in such high regard among RPG fans. In this guide, we’ll provide acomplete guide to “Canvas the Castle,” including acomplete list of the clues and conversationsthat will allow you to solve the crime.
How to Start Canvas the Castle in Oblivion Remastered
Visit Chorrol Castle:
To start “Canvas the Castle” inOblivion Remastered,you’ll want to head to theChorrol Castlein the town of the same name.Chorrolis located west of the Imperial City, and can be entered at any time after completion of the opening tutorial. To begin the quest, visit Castle Chorrol on the east side of the town, and enter through theDoor to Castle Chorrol Great Hall.
Inside the Great Hall, walk up the flight of stairs and you’ll seeCountless Arianna Valgasitting on the throne. Speaking to her, she will reveal that she is currently in the middle of an investigation. Inquiring further will reveal that the investigation is related to the theft of a painting from the castle grounds – a painting that is also a precious heirloom.

Countess Valga will ask you for your help, and agreeing to do so will initiate “Canvas the Castle.”
Even if you know who committed the crime, you will not be able to successfully accuse them until you have the evidence to back it up. Making early or false accusations will dramatically lower a character’s Disposition towards you, making interrogation much harder.
All Suspects in Canvas the Castle – Oblivion Remastered
Canvas for Clues:
Countess Valga suggests that you speak to the residents of the castle before you look for physical clues. Below, we’ll list all possible suspects, where to find them, and what they say when spoken to.
For many of the suspects, you’ll have to increase their Disposition before they’ll allow you to gather clues. If you try to question them before increasing theirDisposition, the results will vary, ranging from polite refusal, to angrily ending the conversation and walking away.

Laythe Wavrick
Castle Herald
Found in the throne room, Laythe is found hovering near the throne. He has red hair and a purple robe.
Orgnolfhas a drinking problem, cannot fund his drinking, asks others for money.

Chanel
Court Mage
Found in her chambers in the southern corner of the Castle’s Private Quarters area.
Chanelclaims she was taking star readings, then to the dining hall, then to her quarters for sleep.

Orok gro-Goth
Steward
Found in his chambers in the northeast corner of the Castle’s Personal Quarters area.
Orokclaims he didn’t see Chanel or Orgnolf at all. Saw Orgnolf in the West Tower recently, drinking.
Orgnolf
Castle Porter
Found on the first floor, in the corridor leading to the throne room. He is on the move. Balding man, unkempt clothing.
Orgnolfclaims he argued with a delivery boy in Great Hall, and spent the rest of the night in his chambers.

Bittneld
Captain of the Chorrol Guard
Found in his office in the Barracks. Across the outer courtyard. Better to speak in the evening, as he patrols Chorrol during the day.
Says he was making his rounds, but claims he sawChanelin the West Tower. She claimed it was spell research.

This is the entire list of suspects, and what you can learn by speaking to them. The two suspects that stick out the most areChanelandOrgnolf, and both seem to have a connection to the West Tower. However, there is no proof that either has any connection to the crime. Let’s see
Collecting All Evidence in Canvas the Castle – Oblivion Remastered
Location 1 – West Tower:
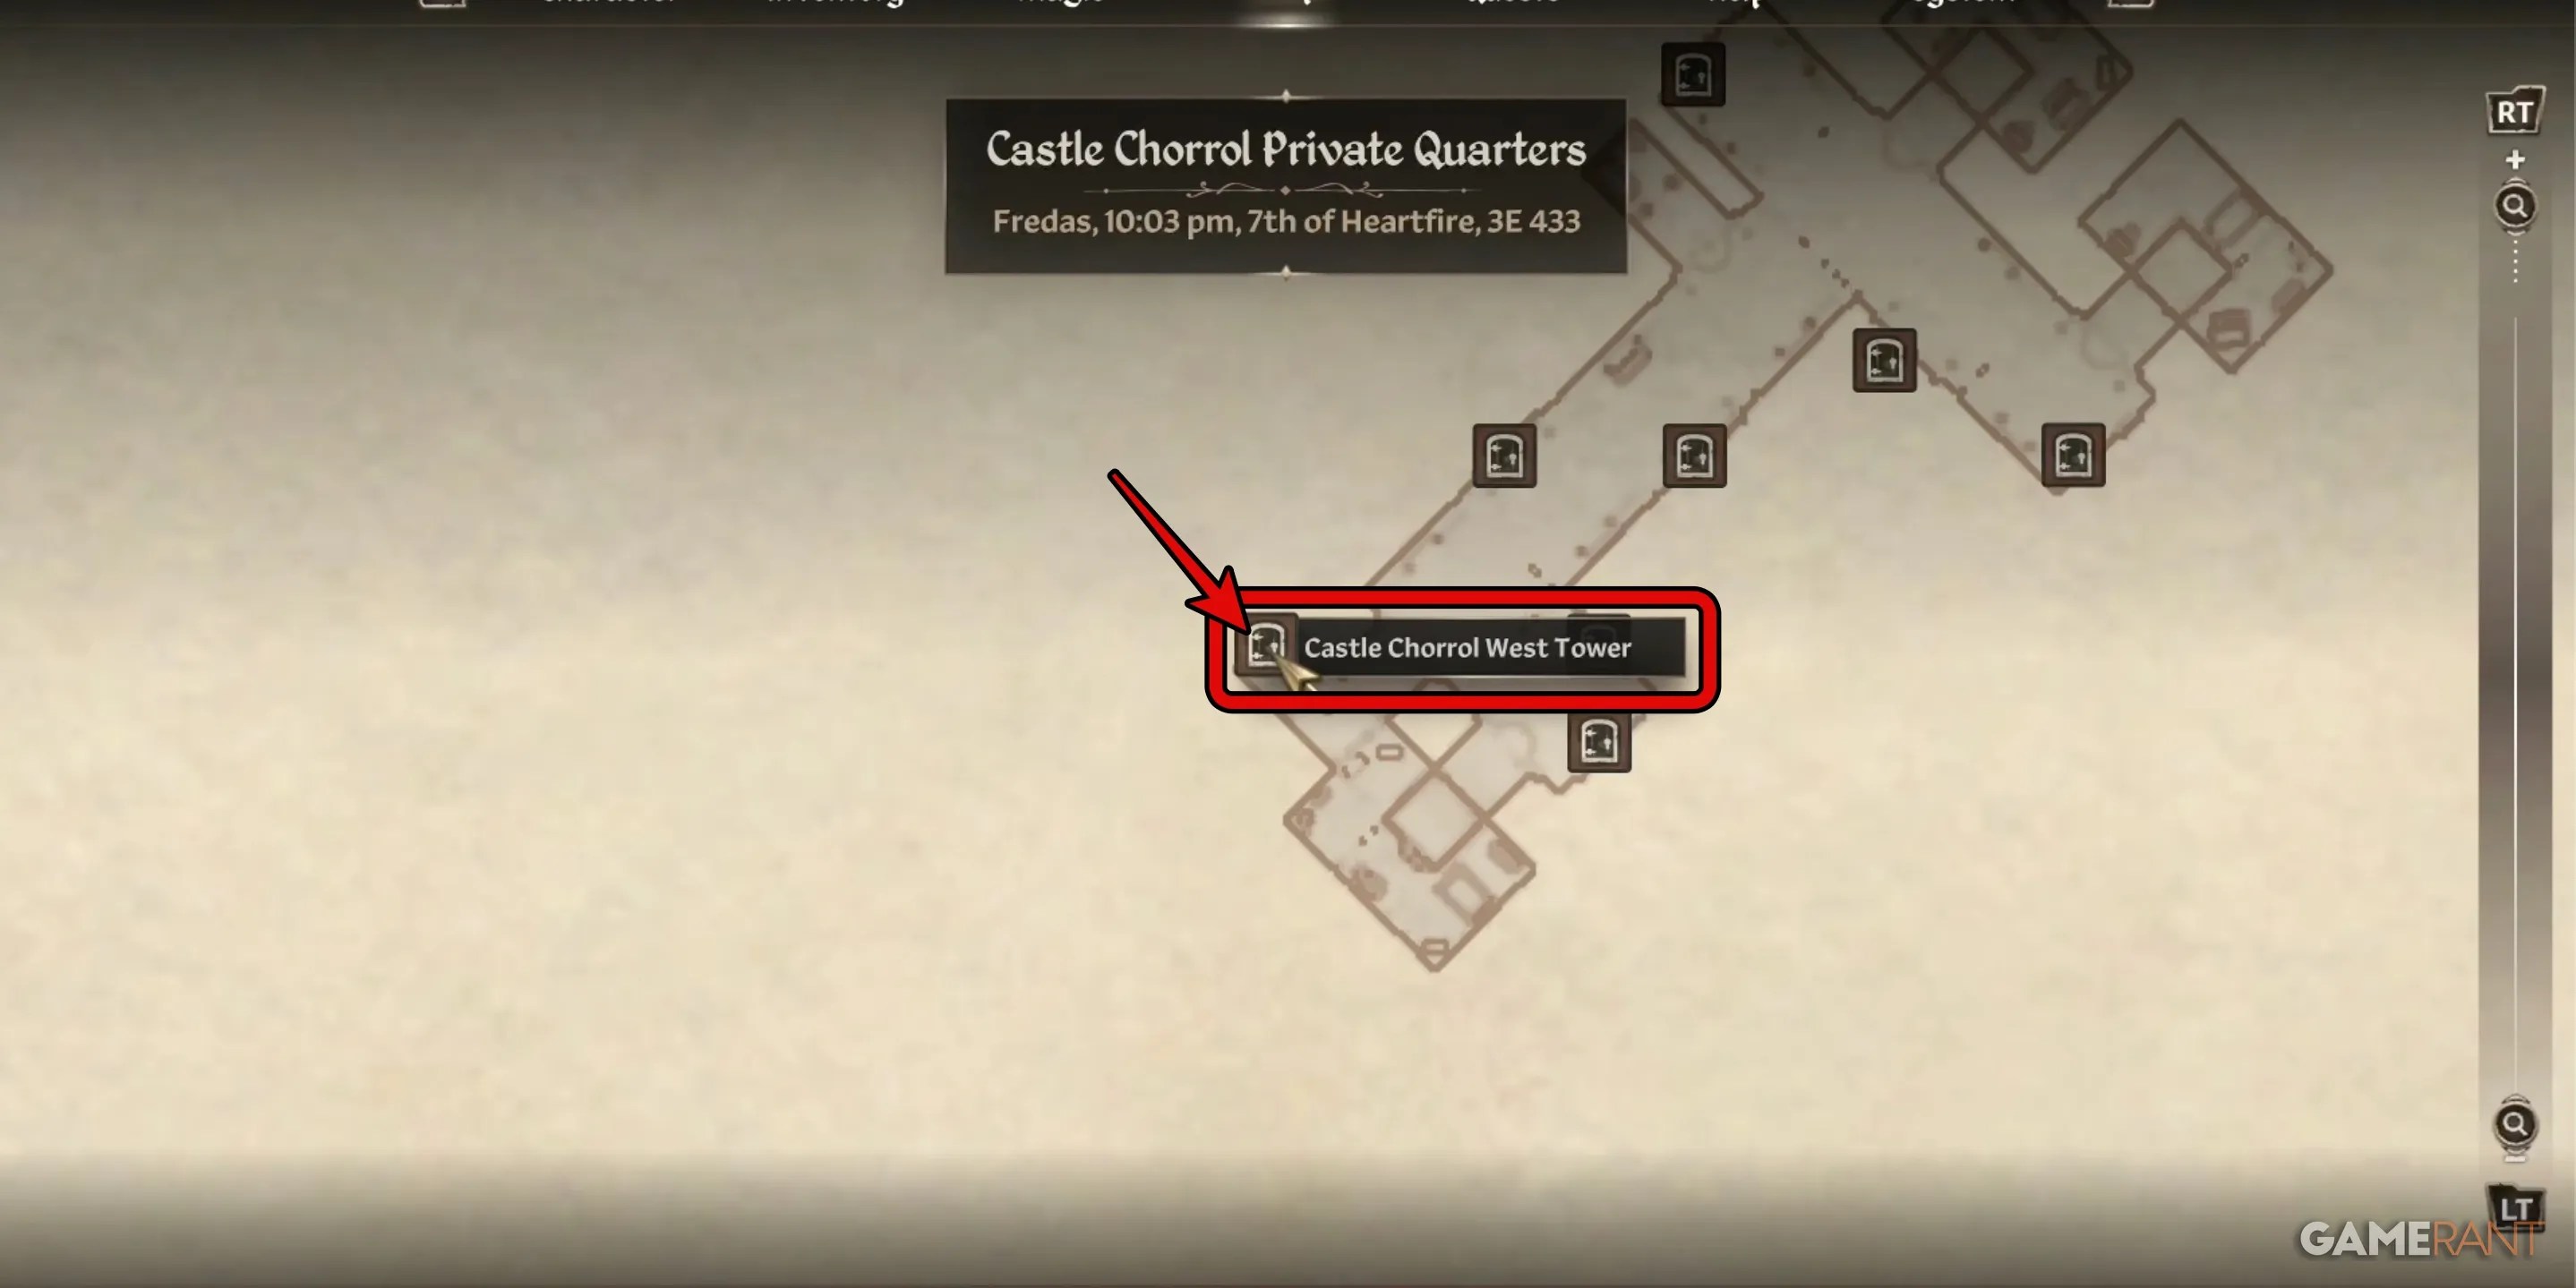
As it’s mentioned multiple times, we’ll start our investigation at theWest Tower.You can easily reach the West Tower by going through the door at the southwestern edge of the Castle Chorrol Private Quaters.
In the West Tower, look behind the crates, and you’ll find aTrap Doorthat leads to a secret lower chamber. Go through the trap door, and you’ll find a hidden area where someone has been painting. Examine the painting to reveal the first clue. While this does not provide proof in itself, it is an important first step. The next goal is to find a suspect who has some kind of connection to painting.

Location 2 – Chanel’s Chamber:
After searching every suspect’s personal quarters, there is only one that reveals any connection to painting. If you enter Chanel’s Quarters and examine her Lectern, you’ll find highly-incriminating painting supplies. Now, a picture is forming. Looking at the remaining clues, we can see that Chanel also spent time in theDining Hall.
Location 3 – Dining Hall:
The final location you’ll need to visit is the Dining Hall, which is just off the throne room. Look at the ground near the far end of the rug beneath the table, at the location of whomever had the end seat.
You’ll find that there ispaint on the rug. With the various clues surrounding the painting, once you locate this final piece of Evidence, the game will inform you that you now have enough to make an accusation.

Canvas the Castle All Endings – Oblivion Remastered
Chanelstole the painting, and is the suspect you should accuse.
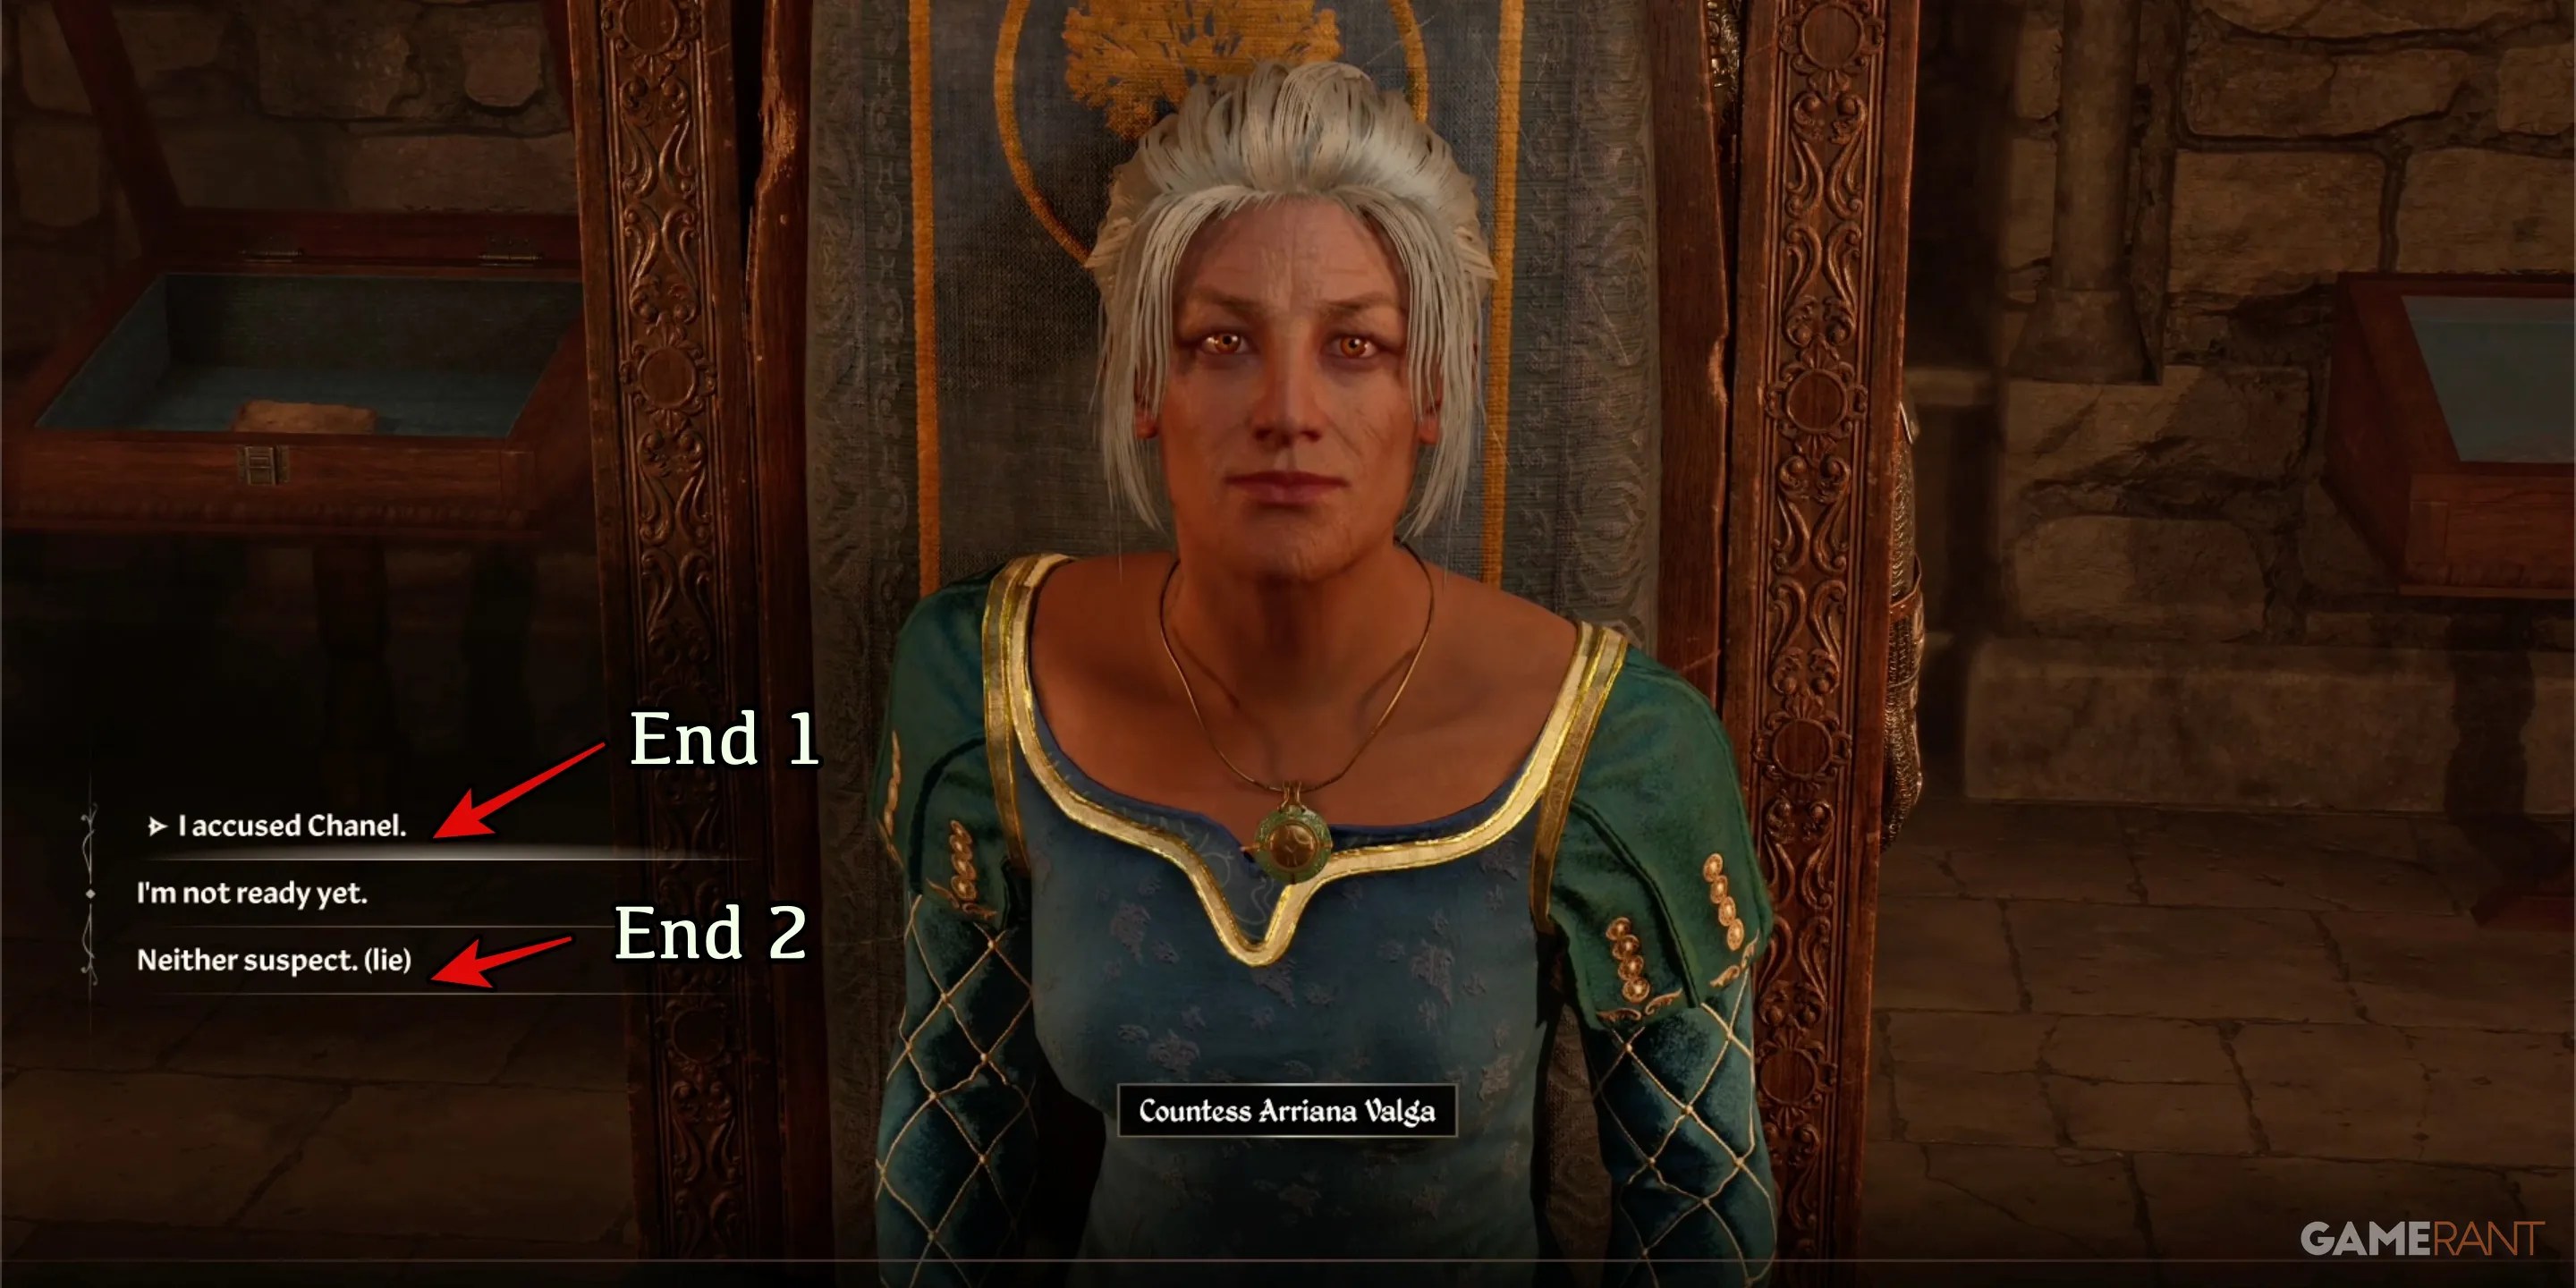
There are two possibleendings to “Canvas the Castle,” with each having their own unique outcomes and rewards. For most players, the question most players will struggle with is whether you should report Chanel to the Countess. It is the answer to this question that separates the quest’s endings.
After you accuse Chanel, and she reveals herself to be the thief, she will explain that it was she that painted the portrait of Count Valga. She loved the Count, and coveted the painting for herself. Her motivations are somewhat sympathetic, but the Countess also has a right to be upset, and wishes for the return of the painting.
Like so many things, it will likely come down to the rewards you wish to collect.
Ending 1 - Turn in Chanel:
The first ending involved turning in Chanel. If you take this route, the Countess will be extremely grateful that you were able to return the painting. And though she decides not to have Chanel imprisoned, the Court Mage will no longer be welcome in Chorrol.
Rewards for Ending 1:
Ending 2 - Lie to the Countess:
The second ending requires that you lie to the Countess, and tell her that neither of the two main suspects stole the painting. It is then implied that you were not able to find the painting at all. Countess Valga is happy to learn that it was not a member of the staff that stole it. The Countess will give you25 Goldfor making an effort.
Next, return to Chanel. She will be extremely grateful that you did not turn her in, and the painting is automatically returned to her. She tells you to return in three weeks, and she’ll have a special painting for you. This will conclude the quest for now. Wait for the time to pass in-game, then return to Chanel. She will reward you with a portrait of your character that can be used as a decoration in your home. Once this is complete, the mission will officially conclude.
